Table of contents
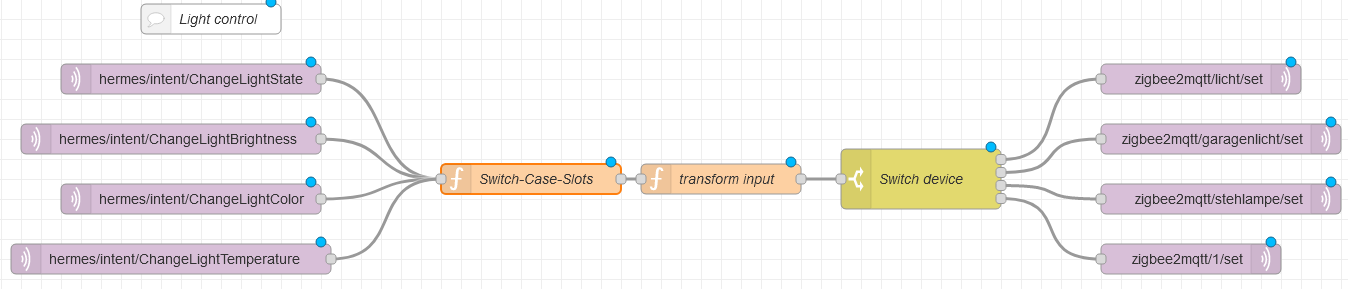
Light control
There are different ways to set up a light. This example is based on setting a light with Hermes and Zigbee2MQTT protocol. To start with Node Red setting, your device should be connected to Zigbee2MQTT broker. Have a look on Zigbee2MQTT to see how you can connect your devices.
Used nodes
We used 4 different nodes in this flow. I explain them from the left to the right.
MQTT IN nodes
This is a Node to subscribe a MQTT topic. These nodes subscribe to the four intents we want to use to control the light. They connect to the local MQTT server on the Raspberry Pi (127.0.0.1:1883) and subscribes to their topic. When a topic enters the MQTT server ont data send with the topic is placed into msg.payload.
Function
A Function Nodes are used to run javascript(JS) code. This JS code usually processes the payload of the message enters this node. Here we used two function nodes in a row.
Switch-Case-Slots function
This function saves all slots, handed over by Snips-NLU, in a single message from this command:
var message = {
    cmd: "",
    name: "",
    state: "",
    brightness: "",
    color: "",
    temperature: ""
};
Here is the full code:
Show full Javascript code
var message = {
    cmd: "",
    name: "",
    state: "",
    brightness: "",
    color: "",
    temperature: ""
};

for (var i = 0; i < msg.payload.slots.length; i++) {
        switch(msg.payload.slots[i].slotName) {
            case "cmd":
                message.cmd = msg.payload.slots[i].value.value;
            break;
            case "name":
                message.name = msg.payload.slots[i].value.value;
            break;
            case "state":
                message.state = msg.payload.slots[i].value.value;
            break;
            case "brightness":
                message.brightness = msg.payload.slots[i].value.value;
            break;
                case "color":
                message.color = msg.payload.slots[i].value.value;
            break;
                case "temperature":
                message.temperature = msg.payload.slots[i].value.value;
            break;
            default:
    }
}

return message;
Transform input function
This function transforms the message from Switch-Case-Slots function in a format Zigbee2MQTT needs it. The actual message for Zigbee2MQTT will be placed into msg.payload. The description is shown later on this page.
Here is the full code:
Show full Javascript code
if (msg.state) {
    if (msg.state.toString() === "ein" | msg.state.toString() === "an") {
        msg.payload = {
            state: "ON"
        }
    } else if (msg.state.toString() === "aus") {
        msg.payload = {
            state: "OFF"
        }
    }
    return msg;
}


if (msg.brightness) {
    msg.payload = {
        brightness: msg.brightness / 100 * 255
    }
    return msg;
}

if (msg.temperature) {
    switch(msg.temperature) {
        case "warmweiß":
            msg.payload = {
                color_temp: 400
            }
        break;
        case "kaltweiß":
            msg.payload = {
                color_temp: 50
            }
        break;
        default:
    }
    return msg;
}

if (msg.color) {
    switch(msg.color) {
    case "blau":
        msg.payload = {
            color: {
                hex: "0x0000FF"
            }
        }
    break;

    case "rot":
        msg.payload = {
            color: {
                hex: "0xFF0000"
            }
        }
    break;

    case "gelb":
        msg.payload = {
            color: {
                hex: "0xFFFF00"
            }
        }
    break;

    case "grün":
        msg.payload = {
            color: {
                hex: "0x008000"
            }
        }
    break;

    case "lila":
        msg.payload = {
            color: {
                hex: "0x800080"
            }
        }
    break;

    case "weiß":
        msg.payload = {
            color: {
                hex: "0xFFFFFF"
            }
        }
    break;
    default:
    }
return msg;
}
Switch device node
This is a simple switch node, it routes the messages to the intend MQTT OUT for the zigbee devices So if the variable msg.name in the message is equal “licht” the message will be routed to the upper MQTT OUT node. This will be also done for the other names defined in there. This is the configuration of the switch node:
"licht" => Output 1
"garagenlicht" => Output 2
"stehlampe" => Output 3
"alle lampen" => Output 4
MQTT OUT
This node publishes the msg.payload to the local MQTT server(127.0.0.1:1883). Zigbee2MQTT will then react to this message.
Zigbee2MQTT basic message syntax
In the MQTT OUT nodes we are using the set functionality of Zigbee2MQTT, so every thing we set will overwrite the settings we want to change, the other remains untouched. The messages Zigbee2MQTT receives are simple json objects with attributes. Here we will only describe the 4 functions we implement.
Change light state
This intent sets the zigbee device on of it depends on the users request.
{"state": "ON"}
This will turn the zigbee device on. Instead of "ON" you can also write “OFF” to turn the light off.
Set brightness
This intent delivers a number between 0 and 100, this will be the brightness of the zigbee device in percentage. The function transform input scales the number between 0 and 255.
{"brightness": 128}
This sets the brightness to the value 128, it is 50% of the maximal brightness.
Change light color
This intent passes us a color written as a string it could be something like "blau", "rot", "gelb", "grün", "lila" or "weiß". The function transform input converts the written color into a hex value that Zigbee2MQTT can understand.
{"color": "0xFFFFFF"}
This message sets the color to the hex value "0xFFFFFF" which is equal white.
Change color temp
This intent passes us one of two temperatures. It can either be "warmweiß" or "kaltweiß". The function transform input sets "warmweiß" to the value 400 which is a nice warm yellow light and "kaltweiß" will be set to 50 which is a freezing white color.
{"color": 400}
This message sets the color temperature to a warm color. The value can be everything between 0 and 512.